

How To Install Pedestal Sink Drain
How to Plumb a Pedestal Sink
Updated: May 06, 2022
We show you every gritty step—start to finish
Make your cramped bath experience more spacious and fashionable by tearing out the old vanity and sink and installing a new pedestal sink. It's the easiest way to remodel a bath. This simple change-out will brand your entire bathroom will experience fresh and new again.
Y'all might also like: TBD
- Fourth dimension
- Complication
- Cost
- Multiple Days
- Intermediate
- $501-m
Pedestal sinks present unique challenges

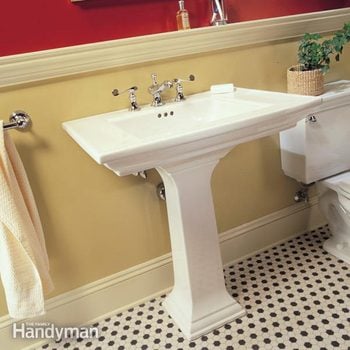
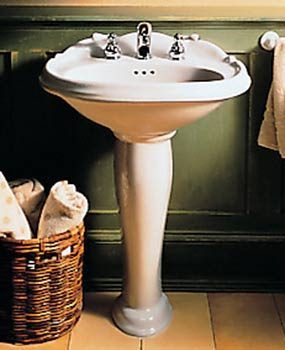
The remodeled bathroom
The pedestal sink makes a bathroom feel bigger. To complement the new sink, yous can add new lights and mirror for even greater touch on.
Replacing your onetime vanity cabinet with a pedestal sink is one of the quickest and easiest ways to remodel a bathroom (Photograph). But nosotros should warn you—pedestal sinks can be tricky to put in, even for pros. Oft the pipes aren't in the correct spot, making information technology difficult to fit the pedestal in identify and connect the pipes so they wait squeamish. Y'all may discover that in that location's no floor tile underneath the vanity cabinet so you'll have to patch or replace the floor. And you may too accept to patch missing baseboard.
In the following article, we'll show you how to handle the most common bug, including how to relocate your drain and water pipes for a neater installation.
You'll be able to install a new pedestal sink and faucet in a day even with no previous feel. If you have to relocate the pipes, plan to spend a few more days to move the pipes and patch and pigment the wall. For this you'll need basic plumbing skills like soldering copper and cutting and gluing plastic pipe.
For a complete listing of the tools and materials you lot'll need, see "Tools and Supplies" beneath. And exist sure to contact your building inspections department to see whether a permit is required for this plumbing work.
Tools and supplies
Tools:
Adjustable wrenches
Large slip joint pliers
Hacksaw with fine-tooth bract
Close-quarters tubing cutter
Tubing cutter
Drill and bits
5/16-in. masonry flake
Tape mensurate
2-ft. level
Soldering tools and supplies: Propane or Mapp gas tank with regulator Lead-free solder Flux Wire brush for 1/2-in. fittings Emery cloth Heat shield material Leather gloves 10-ft. length of i/2-in. copper pipe i/2-in. copper elbows, couplings and caps
PVC pipage tools and supplies: Fine-tooth saw PVC glue PVC primer 1-one/2 in. PVC piping PVC 45- or 90-degree elbows PVC sanitary tee Transition couplings Organic vapor respirator
Other tools: Reciprocating saw and metal-cutting blade Round saw Drywall keyhole saw
Note: You can download a re-create of this list from the Additional information below.
Step 1: Tear out the old vanity

Photo 1: Disconnect the pipes and remove the old sink
Shut off the water at the main shutoff valve. Remove the trap by unscrewing the slip nuts and pulling it down. Cut the tubes that supply h2o to the faucet with a hacksaw or tubing cutter or loosen the basics and pull them out. Lift off the vanity acme and remove the vanity chiffonier.
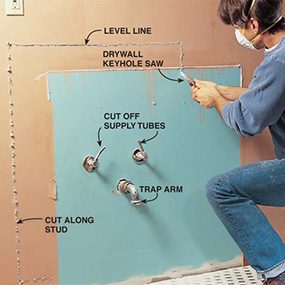
Photo 2: Cut open the wall
Cut out the drywall (or plaster) to expose the plumbing and allow access for installing woods backing. Cut along the edge of the studs. Caution: Proceed your saw bract shallow to avert hitting electric wires.
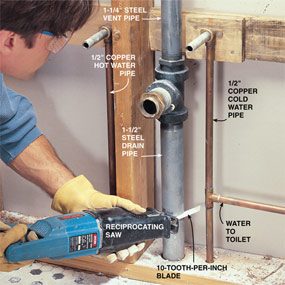
Photo three: Cutting the former drainpipes
Saw off the drainpipe nigh 4 in. from the flooring. To cut steel pipe, utilize a metal-cutting blade in a reciprocating saw, or a hacksaw. Use any fine molar saw to cut plastic pipe. Cut the vent pipage about forty in. upwardly from the floor.
Tear out the quondam sink and vanity (Photo 1) and check the bleed and supply pipage locations. Pedestal sinks look all-time if the bleed and supply pipes are centered and partially hidden by the sink. Your new sink will come with wall measurements showing ideal plumbing locations.
To exist absolutely sure, position the pedestal sink and loosely install your new faucet, pop-up drain and P-trap. Now mensurate from the floor to notice the drain tiptop and determine the best location to put the water supply valves by and large out of sight. Our old drain was vi in. off centre and a few inches too depression. The water pipes also were in the wrong spot.
Pedestal sinks wait best if you shift the plumbing. If you have to relocate pipes, start by removing a section of wall covering wide enough then you can motility the pipes and install woods backing (Photo two). This ways wall repair and repainting later. Use a keyhole saw to cutting the drywall (Photo 2), only proceed the saw bract shallow to avoid hitting wiring or pipes.
Tip: It'south easier to cutting along the border of the studs and add ii×2 drywall nailers alongside the studs later than to endeavour to cut down the middle of the studs.
Footstep 2: Replumb the drain and water supply pipes
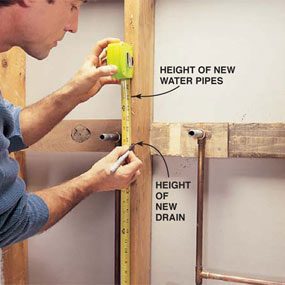
Photo 4: Mark the new pipe locations
Marking the new superlative of the drain and water supply pipes on a stud. Marking the new center of the sink on the lesser plate.
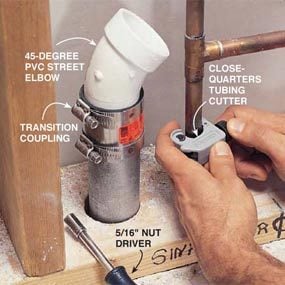
Photograph 5: Connect new to old with transition couplings
Connect the 1-1/ii in. steel drainpipe to a PVC street elbow with a transition coupling. Tighten the clamps with a 5/xvi-in. nut driver or socket wrench. Cut the copper water pipes with a shut-quarters tubing cutter.

Photo 6: Reroute the bleed
Cutting the lengths of PVC pipe then that the drain opening in the sanitary tee is centered on the center marks for the drain. Prime the pipage ends and the inside of the fittings. So spread PVC adhesive on the primed surfaces and quickly get together each articulation, twisting the pipe about a quarter turn equally you push it into the fitting. Concord information technology tightly most 45 seconds.
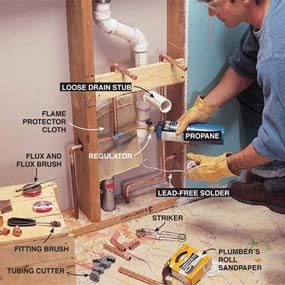
Photo seven: Reroute the supply lines
Assemble the copper supply lines. Cut, clean and solder the copper tubes and fittings. Support the stub-outs with straps and solder a cap on each. Then turn on the water and check for leaks.
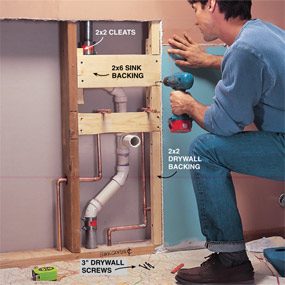
Photo 8: Install sink and drywall backers
Screw a 2×vi to the studs to provide back up for the pedestal sink. Spiral additional 2×2 backing to support drywall edges.

Photograph ix: Close upwards the wall
Cut drywall and fasten it to the studs with 1-ane/4 in. drywall screws. Cover the seams with drywall tape embedded in a layer of joint compound. Trowel on at least ii more layers, allowing each to dry before recoating. Use a 10- or 12-in. trowel for the terminal coat to create a tapered patch. Sand with 100-grit drywall sanding newspaper. Prime and paint the wall and smash upwardly the baseboard before installing the new sink.
Cut steel pipes like ours is a real chore with a hacksaw. Hire or borrow a reciprocating saw (Photo iii) to speed up the chore. Plastic pipes are easy to cutting with whatever fine-tooth saw. To connect PVC (white) plastic drainpipes to either ABS (black) plastic, copper or steel, apply transition couplings (Photo five). Transition couplings take a rubber gasket surrounded by a steel sleeve with screw clamps at each end. Don't misfile them with the solid rubber or rippled steel collar types. Transition couplings are available at home centers and plumbing supply stores. Match the transition coupling to the pipe size. If your old pipes are PVC, then you're fix to go; just prime them and glue the new PVC fittings on.
Plastic pipe makes quick work of relocating your drain. Cut and assemble the bleed and vent pipes equally shown in Photos 5 and 6. Don't worry if you brand a mistake; it'southward easy to set. Only cut the pipe and join a new section with a PVC coupling.
Brainstorm by clamping elbows to the transition couplings on the drain and vent pipes. Then start at the drain and work upward toward the sanitary tee, making sure to eye the germ-free tee on the new sink location and at the correct peak. Complete the bleed past flexing the PVC bleed assembly just enough to glue in the last section of pipe (Photo six).
We've run both the drain and vent pipes at a 45-caste bending for optimal performance. If you're moving the pipes very far, you might have to use 90-degree elbows instead. Go on in mind that your vent pipe shouldn't run horizontally unless information technology'due south at to the lowest degree 6 in. in a higher place the "spill line" of the sink, or about 42 in. above the flooring. Leave the bleed stub unglued until the drywall is finished. Then cut the stub so the trap adapter fits snug to the drywall and glue them all together (shown completed in Photo ten).
To secure the copper pipes and help hold them in place as you solder them, level and screw a fleck of woods between the studs and marker the piping locations on it. Cutting the copper pipe and solder the fittings together (Photo vii). Leave near 6 in. of copper pipe sticking out and solder on a cap and so you can turn the h2o on to test for leaks. When the wall patching and painting is done, install the new shutoff valves (Photo 10).
Screw forest backing to the studs to support the edges of the drywall (Photograph 8). Mensurate the sink for the location of the anchors and screw wood bankroll between the studs in this surface area (Photo eight). If your work requires a permit, phone call for a plumbing inspection before endmost the wall.
Step 3: Install the new sink
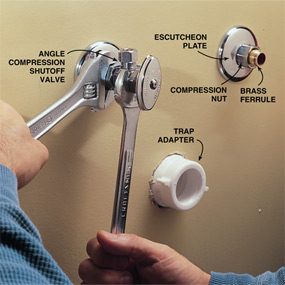
Photo 10: Add shutoffs and adapters
Glue a curt length of pipe and a trap adapter to the sanitary tee inside the wall. Then close the main water valve and use a tubing cutter to cut the copper pipes, leaving 2 in. exposed. Slide the decorative escutcheon (for this project you'll need two 1/two-in. escutcheon), nut and contumely ferrule over the piping stub and adhere a compression-type shutoff valve. Hold the valve body with one wrench while y'all tighten the compression nut with another.
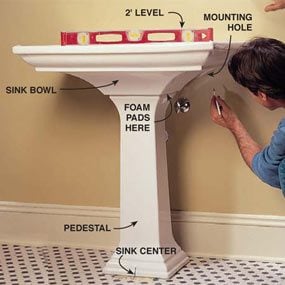
Photo 11: Marking the sink mounting holes
Marker the center of the sink on masking tape stuck to the floor. Align the center of the pedestal with this mark. Set the sink bowl on the pedestal, and lay a two-ft. level across information technology. Place small self-adhesive foam or rubber cushions between the basin and pedestal to level the bowl. Mark the centre of the mounting holes on the wall and floor. Remove the bowl and pedestal and ready them aside.
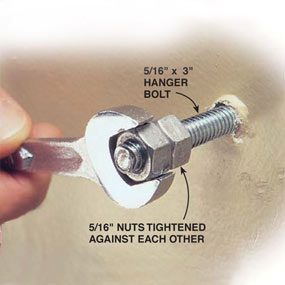
Photograph 12: Mountain the hanger bolts
Drill 3/sixteen-in. pilot holes into the wall at the mounting bolt locations. Tighten 2 5/sixteen-in. nuts against each other on the hanger bolts to provide a grip for the wrench. Screw the hanger bolts in, leaving just enough bolt exposed to extend through the sink mounting pigsty plus 3/8 in. Use a v/16-in. masonry scrap to drill a clearance hole in the tile flooring for the 1/4 x 2-in. pedestal mounting screw. The screw will skid through this hole and screw into the wood subfloor.

Photograph thirteen: Mount the faucet
Adhere the faucet parts to the sink co-ordinate to the instructions provided. The manufacturer of our faucet specified a bead of plumber's putty nether the valves and spout to seal them to the sink.

Photo 14: Add together the bleed assembly
Install the pop-up drain assembly. Press a pencil-width bead of plumber'due south putty nether the rim of the drain earlier you press the drain down into the opening in the sink. Screw this piece to the assembly that mounts under the sink. Get together the rest of the parts and adapt the opening and closing of the stopper co-ordinate to the instructions. Coat the fine threads on the tailpiece with thread sealant and screw the tailpiece into the pop-up associates.

Photo fifteen: Install the sink
Spiral the pedestal base of operations to the floor. Slide the sink over the mounting bolts and install a stainless steel fender washer and acorn nut to secure it. Be careful non to overtighten the nut or you could interruption the sink.
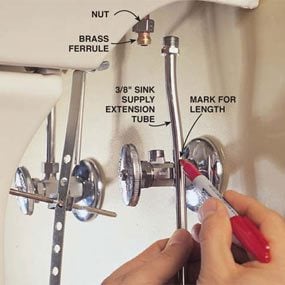
Photo 16: Cut the supply tubes
Mark the supply tubes and cut them with a tubing cutter. Bend them to fit and connect them to the valve and faucet with the nut and contumely ferrule provided.
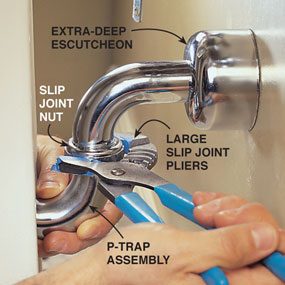
Photo 17: Connect the drain
Complete the installation by connecting the 1-1/4 in. trap assembly to the sink tailpiece and PVC trap adapter. Use a fine-tooth hacksaw blade to cut the trap arm to length if necessary. The arm should extend virtually two in. into the trap adapter. Mitt-tighten the slip articulation connectors. Then tighten an additional quarter turn with a large slip joint pliers. Cover the trap adapter with a special deep escutcheon (extra deep, p-trap diameter), bachelor at about full-service hardware stores.
With the prep piece of work washed, you can mount the sink in nigh three hours. Here'southward how. First, install the valves, bleed stub and sink mounting bolts (Photos 10 – 12). Next follow the faucet directions to install the faucet and pop-upwards drain on the sink (Photos xiii and fourteen). Finally, mountain the sink and connect the plumbing (Photos fifteen – 17).
When you set the sink on the pedestal to marker the mounting holes, don't be surprised if it'southward a little tippy—they're non ever perfect. Slide plastic shims under the pedestal if necessary to keep it from rocking, and stick cream pads or rubber cabinet door bumpers under the sink bowl to level it earlier marker the wall and floor for the mounting screws (Photograph xi). When the installation is done, fill the gaps at the flooring and between the pedestal and bowl with silicone caulk that matches the sink.
Making the final connectedness betwixt the faucet and valve tin can be tricky. If you're having trouble plumbing equipment the supply tube into the valve (Photo 16), loosen the valve (reverse the procedure shown in Photo 10) and swivel it to allow clearance to insert the tube. So retighten the connection. Ever use 2 wrenches to tighten compression fittings, one to concord the valve and the other to tighten the nut.
Complete the sink installation by installing the P-trap assembly (Photo 17). Hand-tighten the slip joints. Then requite them an extra quarter turn with a big slip joint pliers. This is a tight spot to work—ideally, your plumbing is lined up simply right so you tin finish before your neck cramps up!
Double-check all your connections. Fill the bowl with h2o. And so let it out and watch for leaks. Tighten leaky joints. If this doesn't work, you lot'll accept to take apart the leaky joint and brand sure the rubber slip articulation gaskets are in place and the contumely ferrules on the compression fittings are squarely seated.
Shopping for pedestal sinks

Kohler Portrait
American Standard Reminiscence

American Standard Colony
Before pedestal sinks became popular again, you lot had to scrounge around the salvage yards to notice ane, but today you'll find one-half a dozen styles in stock at most home centers, and dozens more in manufacturers' catalogs. The sinks are 20 to 30 in. wide and cost nigh $70 to more than $700. First pick out a faucet. And so buy a sink with holes to friction match the faucet.
You'll need a few additional parts and supplies. Buy a 1-one/4 in. 17-gauge chrome-plated trap assembly to connect the drain. The metal pipe cover (escutcheon) that comes with the trap is too shallow to cover the PVC trap adapter and nut we'll be installing, so purchase an extra-deep (p-trap diameter) escutcheon (Photo 17). If y'all don't take them already, buy two shutoff valves. Buy valves with a compression plumbing fixtures to tighten onto 1/2-in. copper pipe (Photo ten) or valves with pipe threads if yous're connecting to the old threaded fe pipes. Buy faucet supply tubes to match your faucet. If your faucet has "pigtails" like ours that are too brusk, buy two iii/8-in. exterior diameter extension tubes (Photograph sixteen).
Many faucets take no tubes attached. For these, buy standard faucet supply tubes. The rigid chrome-plated ones like the ones nosotros're using look the best, but flexible braided stainless tubes are much easier to hook up. Buy a small container of plumber's putty (Photo 13) and thread sealant for the sink tailpiece (Photo xiv). All these plumbing supplies are bachelor at home centers and full-service hardware stores. Pedestal sink mounting systems vary. Read the directions included with your sink to find out what you need.
Additional Information
- Tools and supplies list
Required Tools for this Project
Y'all tin can download a copy of the Tools and Supplies Listing from the additional information.
Required Materials for this Project
Avert last-minute shopping trips by having all your materials fix alee of time. Here's a list.
You can also download a re-create of the Tools and Supplies List from the boosted information.
Originally Published: November 28, 2022

Source: https://www.familyhandyman.com/project/how-to-plumb-a-pedestal-sink/
Posted by: mulhernexpregiat.blogspot.com
0 Response to "How To Install Pedestal Sink Drain"
Post a Comment